As I was busy designing the template for this website, I was not able to post the tutorial 13 of the Illustrator Course. but now I'm here with two tutorials for you & they will teach you the following things:
- Distort using the Wrap Effects
- Applying the Live Paint &
- Masking using the Clipping Path or the Opacity Mask
Distort using Warp Effects
Liquify Tools can add some wacky distortion to your photos or shapes easily using different distortion effects. Though it is not popular but we will still take a look at how it works.
Liquify Tools
You can have some wacky distortion using the Liquify Tools. Here is the list of liquify tools.

Here I have a leaf with different warp effects applied. Though I find the uses for warp is quite limited. However, if you put some creative to it. See these awesome effects on a leaf.

Drawing a Graph
Sometimes you may have to chart data. Illustrator has some quick tools for drawing different type of charts and graphs to make your presentation stand out from the crowd. You can draw pie charts, line graphs, bar graphs and more.

Select the Bar Graph Tool and click and drag an area on the artboard. The table data will appear. Fill in the x-axis and y-axis with your table values. Once confirmed, click the tick to create your graph. You can also leave out the word labels if you don’t need it.

Once you have confirmed the data, it will generate a greyscale graph. You can then use Direct Selection Tool to select the shapes and change the color.

Conclusion for "Distort using Wrap Effect"
There are more things you can do to make your chart stand out. Some common techniques are applying 3D Extrude to pie or graph charts to make it 3D. Other than this, you can replace the bring grey bars with graphics.
Applying Live Paint
With Live Paint, you can freely paint your artwork. It is like painting a kid’s coloring book where you have the line art and you start filling them will different colors, you will see how to break a star into different segments using Live Paint.
Creating a Beveled Star using Live Paint
I will show you an example of using Live Paint to draw a beveled star. Let’s turn on Smart Guides to make snapping of points easier. Go View>Smart Guide to turn on Smart Guides.

Draw a star on the canvas. Select the Line Tool and roll over the top anchor point. The anchor text will appear. Click once.

Click the second point at the bottom of the anchor to create the first line.

Continue doing this for all opposite points.

Here is the final wireframe.

Select all the shapes with Selection Tool. Next click the Live Paint and fill the first area with light grey.


Continue filling in different shades for all segments.

You notice the black stroke is still on. Select your star and click None for stroke.

Once you are happy with it you can expand the shapes to break it into normal paths.

This is our final beveled star.

Conclusion of "Applying Live Paint"
Imagine drawing this beveled star using Pen Tool only, you will have to draw 10 different triangle segments which will definitely take up more time. You may even have problems aligning the points. With Live Paint, this chore is made a lot simpler.
Masking using Clipping Path/ Opacity Mask
With Clipping Mask and Opacity Mask, you can quickly mask away any unwanted areas you wish to hide. Let’s take a look how it works…
Clipping Mask
In this illustration I have 3 layers. The background, sunburst effect and the sun. I will need to mask the sunburst to a square.

First, I will select both the sunburst and background and group it together. Select both with Selection Tool and press Ctrl/Command+G to group it.

Draw a rectangle to decide the area you want to show. Make sure it is at the topmost layer.

Select both the background and the path. Right click and select Make Clipping Mask (Object>Clipping Mask>Make).

Next send the background to the back by pressing Ctrl+Shift+[ / Command+Shift+[.

Editing Clipping Mask
To make any changes to the clipping mask go under the group and select Clipping Path. You can rescale your clipping path in here. To remove the clipping path, go Object>Clipping Mask>Release.

Opacity Mask
Opacity lets your create transparency to your layer. The Intensity of black will determine the opacity of the layer. Black will be transparent and white will be opaque.
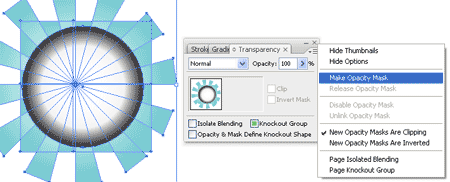
Instead of drawing a square in our previous example, I’m now going to draw a circle instead and fill it with gradient.

Now select both shapes and select Make Opacity Mask by clicking the Options icon at the corner of the Transparency Palette.

So now, I have an opacity mask that has the edges fading out. Opacity Mask is a very good way of blending edges to the background and it will prove useful in your illustrations.


 About
About Tags
Tags Popular


Can we only draw the star with the pen tool ?
ReplyDelete