


Tutorial 2: Create your First Website
With what you learned in the previous lessons, you are now only minutes away from making your first website.
How?
In Lesson 1 we looked at what is needed to make a website: a browser and Notepad (or similar text editor). Since you are reading this, you most likely already have your browser open.
- Open an extra browser window (open the browser one more time) so you can read this tutorial and see your new website at the same time.
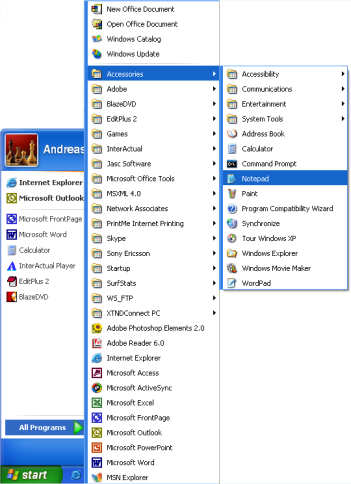
- Open Notepad (Start > All Programs > Accessories > Notepad).
Now we are ready!
What can I do?
Let us start with something simple. How about a page that says: "Hurrah! This is my first website." Read on and you'll find out how simple it is.
HTML is simple and logical. The browser reads HTML like you read English: from the top down and from left to right. Thus, a simple HTML document begins with what should come first and ends with what should come last.
The first thing you need to do is to tell the browser that you will "talk" to it in the language HTML. This is done with the tag
<html> (no surprises there). So before you do anything else type "<html>" in the first line of your document in Notepad.
As you may recall from the previous lessons,
<html> is an opening tag and must be closed with a closing tag when you are finished typing HTML. So to make sure you don't forget the HTML close tag now type </html> a couple of lines down and write the rest of the document between <html> and </html>.
The next thing your document needs is a "head", which provides information about your document, and a "body", which is the content of the document. Since HTML is nothing if not logical, the head (
<head> and </head>) is on top of the body (<body> and </body>).
Your document should now look like this:
<html>

   <head>
   </head>

   <body>
   </body>

</html>
Note how we structured the tags with new lines (using the Enter key) as well as indents (using the Tab key). In principle, it does not matter how you structure your HTML document. But to help you, and others reading your coding, to keep an overview, we strongly recommend that you structure your HTML in a neat way with line breaks and indents, like the above example.
If your document looks like the above example, you have made your first website — a particularly boring website and probably not what you dreamt of when you started this tutorial but still some sort of a website. What you have made will be the basic template for all your future HTML documents.
So far so good, but how do I add content to my website?
As you learned earlier, your HTML document has two parts: a head and a body. In the head section you write information about the page, while the body contains the information that constitutes the page.
For example, if you want to give the page a title that will appear in the top bar of the browser, it should be done in the "head" section. The element used for a title is title. So write the
title of the page between the opening tag <title> and the closing tag </title>:
<title>My first website</title>
Note that this title will not appear on the page itself. Anything you want to appear on the page is content and must therefore be added between the
<body> tags.
As promised, we want the page to say "Hurrah! This is my first website." This is the text that we want to communicate and it therefore belongs in the body section. So in the body section, type the following:
<p>Hurrah! This is my first website.</p>
The p in
<p> is short for "paragraph", which is exactly what it is — a text paragraph.
Your HTML document should now look like this:
 <html>

 <head>
   <title>My first website </title>
 </head>

 <body>
   <p>Hurrah! This is my website.</p>
 </body>

 </html>
Done! You have now made your first real website!
Next all you have to do is to save it to your hard drive and then open it in your browser:
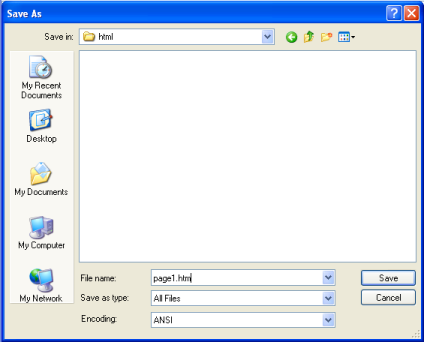
- In Notepad choose File > Save as.Note: If you are on a Mac using something like TextEdit, then convert to plain text first and then save the file: Format > Make Plain Text and then Save as.
- In the Save as type box, choose All Files.Note: This is very important. Otherwise, you save it as a text document and not as an HTML document.
- Save your document as page1.html or page1.htm.The ending .html indicates that it is an HTML document. .htm has the same result. I always use .html but you can choose whichever of the two extensions you prefer. It doesn't matter where you save the document on your hard drive as long as you remember where you saved it so you can find it again.
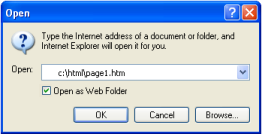
- Open your browser and press CTRL+O.
- Click Browse in the box that appears.
- 6. Find your HTML document and click Open and then click OK.
It now should say "Hurrah! This is my first website." in your browser and the title of the browser page should be "My first website". Congratulations!
After 2-3 next tutorials, you will also learn how to upload your website to Internet.
After 2-3 next tutorials, you will also learn how to upload your website to Internet.
 About
About Tags
Tags Popular


Its good and nice
ReplyDelete