Showing posts with label HTML Tutorials. Show all posts

Wednesday, 25 February 2015

The Final Tips - HTML5 Tutorial 10


The final tips

Congratulations, you have now reached the final lesson.

So now I know everything?

You have learned a lot and you are now capable of making your own websites! However, what you have learned are the basics and there is still a lot more to be mastered. But you now have a good foundation from which to build on.
In this last lesson, you will get some final tips:
  • First, it is a good idea to maintain order and structure in your HTML documents. By posting well arranged documents you will not only show others your mastery of HTML but will also make it considerably easier for yourself to keep an overview.
  • Stick to the standards and validate your pages. This cannot be stressed enough: Always write clean XHTML, use a DTD and validate your pages on validator.w3c.org.
  • Give your page contents. Remember that HTML is a tool, which enables you to present information on the Internet, so make sure that there is information to present. Pretty pages may look nice but most people use the Internet to find information.
  • Avoid overloading your pages with heavy images and other fancy stuff you have found on the Internet. It slows down the loading of the page and could be confusing for visitors. Pages that take more than 20 seconds to load can lose up to 50% of their visitors.
  • Remember to add your website to search engines/directories so people other than your closest family can find and enjoy it. On the front page of all search engines, you will find a link to add new pages (The most important is Google, but there are also others like DMOZ,YahooAltaVistaAlltheWeb and Lycos).
  • In this HTML5 course, you have learned to use Notepad, which is a simple and very easy to use editor, but perhaps you will find it helpful to use a more advanced editor which gives a better overview and more possibilities.

How do I learn more?

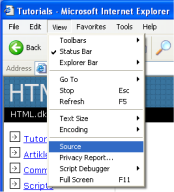
First of all, it is important that you continue to work and experiment with the things you have learned in this tutorial. Study other people's websites and if you find something you like see how it was made with "View Source" (Click "View" in the menu in your browser and choose "Source").

View source

Search the Internet for examples and articles on HTML. There are lots of websites with great contents on HTML.

The only thing left is to wish you hours of fun with your new friend, HTML.
See you on the Internet :-)

A Review to Everything you have Learned - HTML5 Tutorial 9


A Review to Everything you have Learned

In this HTML5 Tutorial, You will get a full review of what you have learned in the previous tutorials and this is the second last tutorial of our HTML5 Course.

Elements and Tags

In the start, we learned about Elements and tags. Tags are basically labels you use to mark up the beginning and end of an element. All tags have the same format: they begin with a less-than sign "<" and end with a greater-than sign ">". Generally speaking, there are two kinds of tags — opening tags: <html> and closing tags: </html>. The only difference between an opening tag and a closing tag is the forward slash "/". You label content by putting it between an opening tag and a closing tag.
Most browsers might not care if you type your tags in upper, lower or mixed cases. <HTML><html> or <HtMl> it will normally give the same result. However, the correct way is to type tags in lowercase. So get into the habit of writing your tags in lowercase.
You type your tags in an HTML document. A website contains one or more HTML documents. When you surf the Web, you merely open different HTML documents.

Making your own simple site

Then we learned about making our own simple site. Here's a review for it.
Let us start with something simple. How about a page that says: "Hurrah! This is my first website."
The first thing you need to do is to tell the browser that you will "talk" to it in the language HTML. This is done with the tag <html> (no surprises there). So before you do anything else type "<html>" in the first line of your document in Notepad. And also don't forget the HTML close tag now type </html> a couple of lines down and write the rest of the document between <html> and </html>.
The next thing your document needs is a "head", which provides information about your document, and a "body", which is the content of the document. Since HTML is nothing if not logical, the head (<head> and </head>) is on top of the body (<body> and </body>).
We strongly recommend that you structure your HTML in a neat way with line breaks and indents.
your HTML document has two parts: a head and a body. In the head section you write information about the page, while the body contains the information that constitutes the page.
For example, if you want to give the page a title that will appear in the top bar of the browser, it should be done in the "head" section. The element used for a title is title. So write the title of the page between the opening tag <title> and the closing tag </title>.
 we want the page to say "Hurrah! This is my first website." This is the text that we want to communicate and it therefore belongs in the body section. So in the body section, in between the paragraph tag <p> and </p> type "Hurrah! This is my first website."
Done! You have now made your first real website!
Next all you have to do is to save it to your hard drive and then open it in your browser:

  1. In Notepad choose File > Save as.Note: If you are on a Mac using something like TextEdit, then convert to plain text first and then save the file: Format > Make Plain Text and then Save as.
  2. In the Save as type box, choose All FilesNote: This is very important. Otherwise, you save it as a text document and not as an HTML document.
  3. Save your document as page1.html or page1.htm.The ending .html indicates that it is an HTML document. .htm has the same result. I always use .html but you can choose whichever of the two extensions you prefer. It doesn't matter where you save the document on your hard drive as long as you remember where you saved it so you can find it again.
  4. Open your browser and press CTRL+O.
  5. Click Browse in the box that appears.
  6. 6. Find your HTML document and click Open and then click OK.
It now should say "Hurrah! This is my first website." in your browser and the title of the browser page should be "My first website". Congratulations!

Attributes

As you probably know, elements give structure to a HTML document and tells the browser how you want your website to be presented (for example,<br> tells the browser to insert a line break). In some elements, you can add more information. This additional information is called an attribute.
Attributes are always written within a start tag and are followed by an equal sign and the attribute details written between quotes.
The title attribute is used to type a short description of the content that displays when you hover over it.

Links

To make links, you use what you always use when coding HTML: an element. A simple element with one attribute and you will be able to link to anything and everything.
If you want to make a link between pages on the same website, you do not need to spell out the entire address (URL) for the document. For example, if you have made two pages (let us call them page1.htm and page2.htm) and saved them in the same folder you can make a link from one page to the other by only typing the name of the file in the link.
You can also create internal links within a page. For example a table of contents at the top with links to each chapter below. All you need to use is a very useful attribute called id (identification) and the pound symbol "#".

Layout (CSS)

Use Cascading Style Sheets (CSS) to give your website layout, style, and the formats you want. In this lesson you will get a short introduction to CSS. But later you can learn all about CSS from us after the HTML 5 Tutorial Ends. So please consider this lesson only as an appetizer.

CSS is the better half of HTML. And in coding, there is no equality of status: HTML takes care of the rough stuff (the structure), while CSS gives it a nice touch (layout).
One of the smart features of CSS is the possibility to manage your layout centrally. Instead of using the style attribute in each tag, you can tell the browser once how it must layout all the text on the page.
CSS can be used for much more than specifying font types and sizes. For example, you can add columns, colours and backgrounds.
Besides adding layout such as colors, font types etc., CSS are also used to control the page layout and presentation (margins, float, alignment, width, height, etc.). By regulating the different elements with CSS you are able to layout your pages elegantly and precisely.

Web standards and validation

HTML can be coded in many different ways. And browsers can read HTML in just as many ways. You could say that HTML has many dialects. That is why some websites look different in different browsers.
There have been attempts to make a common standard of HTML through the World Wide Web Consortium (W3C) founded by Tim Berners-Lee (yep! the great guy who invented HTML). But it has been a long and tough road.
In the old days - when browsers where something you had to pay for - Netscape was the dominate browser. Back then, the most supported HTML standard where called 2.0 and later 3.2. But with a market share of over 90% Netscape did not have to - and did not - care much about common standards. On the contrary, Netscape invented their own strange elements, which did not function in other browsers.
For many years Microsoft almost completely ignored the Internet. After a while they took up the competition with Netscape and introduced a browser. The first versions of Microsoft's browser, Internet Explorer, was not any better than Netscape at supporting the HTML standards. But Microsoft chose to give away their browser for free (always a popular thing to do) and Internet Explorer soon became the most popular browser.

Validate

Insert a DTD in your pages and you can always check your HTML for errors by using W3C's free validator.
To test this out, make a page and upload it to the Internet. Now, go to validator.w3.org and type the address (the URL) of your page and validate it. If your HTML is correct you will get a congratulations message. Otherwise you will get an error report telling you exactly what and where you have done something wrong. Make some errors on purpose to see what happens.
The validator is not just helpful to locate an error. Some browsers try to compensate for lack of skills among web developers by trying to fix errors in the HTML and showing the page as they guess it should look. With such browsers, you might never see an error in your own browser. However, other browsers might guess differently or not show the page at all. The validator can help you find errors you did not even know existed.
Always validate your pages to be sure they will always be shown correctly.

Monday, 23 February 2015

Web Standards & Validations - HTML5 Tutorial 8


Web standards and validation

In this lesson, you will get a little more theoretical knowledge on HTML.

What more is there to know about HTML?

HTML can be coded in many different ways. And browsers can read HTML in just as many ways. You could say that HTML has many dialects. That is why some websites look different in different browsers.
There have been attempts to make a common standard of HTML through the World Wide Web Consortium (W3C) founded by Tim Berners-Lee (yep! the great guy who invented HTML). But it has been a long and tough road.
In the old days - when browsers where something you had to pay for - Netscape was the dominate browser. Back then, the most supported HTML standard where called 2.0 and later 3.2. But with a market share of over 90% Netscape did not have to - and did not - care much about common standards. On the contrary, Netscape invented their own strange elements, which did not function in other browsers.
For many years Microsoft almost completely ignored the Internet. After a while they took up the competition with Netscape and introduced a browser. The first versions of Microsoft's browser, Internet Explorer, was not any better than Netscape at supporting the HTML standards. But Microsoft chose to give away their browser for free (always a popular thing to do) and Internet Explorer soon became the most popular browser.
From version 4 and 5 Microsoft aimed to support more and more of the HTML standards from W3C. Netscape did not manage to develop a new version of their browser and continued to distribute the outdated version 4.
The rest is history. Today the HTML standards are called 4.01 and XHTML. Now it is Internet Explorer that has a market share of over 90%. Internet Explorer still has its own strange elements but it also supports the W3C HTML standards. And so do all of the other browsers, such as Mozilla, Chrome, Opera and Netscape.
So, when you code HTML following the W3C standards, you make websites that can be seen in all browsers - both now and in the future. And luckily, what you have learned in this tutorial is a new and stricter and cleaner version of HTML called XHTML.

How do I tell which version is used?

With all the different types of HTML you need to tell the browser which "dialect" your HTML is in, in your case XHTML. To do that, you use a Document Type Declaration. The Document Type Declaration is always written in the top of the document:

Example 1:
 
 <!DOCTYPE html PUBLIC "-//W3C//DTD XHTML 1.0 Strict//EN" 
  "http://www.w3.org/TR/xhtml1/DTD/xhtml1-strict.dtd">

 <html xmlns="http://www.w3.org/1999/xhtml" lang="en">

 <head>
 <title>Title</title>
 </head>

 <body>
 <p>text text</p>
 </body>

 </html>
 
 
Besides the Document Type Declaration (the first line in the example above), which tells the browser that you want to write XHTML, you also need to insert some extra information in the html tag with the two attributes xmlns and lang.
xmlns is short for "XML-Name-Space" and should always have the value http://www.w3.org/1999/xhtml. That is all you need to know. But if you have a big hunger for complicated knowledge you can read more about namespaces on W3C's website.
In the lang attribute you state which language the document is written in. For this the ISO 639 standard is used, which lists codes for all the languages in the world. In the example above the language are set to English ("en").
With a DTD the browser knows exactly how it should read and show your HTML. Hence, use the example above as template for all your future HTML documents.
The DTD is also important when you want to validate your pages.

Validate? Why and how should I do that?

Insert a DTD in your pages and you can always check your HTML for errors by using W3C's free validator.
To test this out, make a page and upload it to the Internet. Now, go to validator.w3.org and type the address (the URL) of your page and validate it. If your HTML is correct you will get a congratulations message. Otherwise you will get an error report telling you exactly what and where you have done something wrong. Make some errors on purpose to see what happens.
The validator is not just helpful to locate an error. Some browsers try to compensate for lack of skills among web developers by trying to fix errors in the HTML and showing the page as they guess it should look. With such browsers, you might never see an error in your own browser. However, other browsers might guess differently or not show the page at all. The validator can help you find errors you did not even know existed.
Always validate your pages to be sure they will always be shown correctly.

Friday, 13 February 2015

Layout (CSS) and Uploading Pages - HTML 5 Tutorial 7


Layout (CSS)

Wouldn't be great if you could give your pages the layout they deserve?

Sure, but how?

Use Cascading Style Sheets (CSS) to give your website layout, style, and the formats you want. In this lesson you will get a short introduction to CSS. But later you can learn all about CSS from us after the HTML 5 Tutorial Ends. So please consider this lesson only as an appetizer.

CSS is the better half of HTML. And in coding, there is no equality of status: HTML takes care of the rough stuff (the structure), while CSS gives it a nice touch (layout).
As shown in in the Last Lesson, the style attribute can control text colour:

Example 1:
 
 <h2 style="color:green">HTML</h2>
 
 
Will look like this in the browser:

HTML

In the example above we use the style attribute to change the colour. If you wanted to change the colour of every h2 on the page, you'd have to set the style attribute on all of them.

It seems like a lot of work?

One of the smart features of CSS is the possibility to manage your layout centrally. Instead of using the style attribute in each tag, you can tell the browser once how it must layout all the text on the page:

Example 2:
 
 <html> 
 
   <head>  
     <title>My first CSS page</title>
     <style type="text/css">
       h1 {font-size: 30px; font-family: arial;} 
       h2 {font-size: 15px; font-family: courier; color:green;} 
       p {font-size: 8px; font-family: "times new roman";} 
     </style> 
   </head>
   
   <body>
     <h1>My first CSS page</h1>
     <h2>Welcome to my first CSS page</h2>
     <p>Here you can see how CSS works </p> 
   </body>
 
 </html> 
 
 
In the example above CSS has been inserted in the <head> section and therefore applies to the entire page. To do this, just use the tag <style type="text/css"> which tells the browser that you are typing CSS.
In the example all headings on the page will be in Arial in size 30px. All subheads will in Courier size 15 and green. And all text in normal paragraphs will be in Times New Roman size 8 (notice how we set both the font size and font-family with a separating semicolon).
Another, even better option is to create the CSS in a separate document. With a separate CSS documents you can manage the layout of many pages all at once. This is pretty smart if you want to change the font type or size on a large website with hundreds or thousands of pages. We won't go into that now but you can learn it later in our CSS tutorial.

What else can I do with CSS?

CSS can be used for much more than specifying font types and sizes. For example, you can add columns, colours and backgrounds. Here are some examples for you to experiment with:

 
 <body style="background-image: url('http://www.html.net/logo.png');"> 

 <p style="color:green;">Green text</p>

 <h1 style="background-color: blue;">Heading on blue background</h1> 
 
 
Try inserting the examples in some of your pages - both as shown above and also as CSS inserted in the head section.

Is CSS nothing but colours and font types?

Besides adding layout such as colors, font types etc., CSS are also used to control the page layout and presentation (margins, float, alignment, width, height, etc.). By regulating the different elements with CSS you are able to layout your pages elegantly and precisely.

Example 3:
 
 <p style="padding:25px;border:1px solid red;">I love CSS</p>
 
 
Will look like this in the browser:
I love CSS
With the property float an element can either be floated to the right or to the left. The following example illustrates the principle:

Example 4:
 
 <img src="bill.jpg" alt="Bill Gates" style="float:left;" >

 <p>Lorem ipsum dolor sit amet, consectetuer adipiscing elit, 
 sed diam nonummy nibh euismod tincidunt ut laoreet dolore 
 magna aliquam erat volutpat. Ut wisi enim ad minim veniam, 
 quis nostrud exerci tation ullamcorper suscipit 
 lobortis nisl ut aliquip ex ea commodo consequat...</p> 
 
 
Will look like this in the browser:

Bill Gates
 Lorem ipsum dolor sit amet, consectetuer adipiscing elit, sed diam nonummy nibh  euismod tincidunt ut laoreet dolore magna aliquam erat volutpat. Ut wisi enim ad  minim veniam, quis nostrud exerci tation ullamcorper suscipit lobortis nisl ut aliquip ex  ea commodo consequat...


In the example, one element (the image) floats to the left and the other element (the text) fills the hole.
With the property position, you can place an element exactly where you want it in your page:

Example 5:
 
 <img src="bill.jpg" alt="Bill Gates" style="position:absolute;bottom:50px;right:10px;" >
 
 
In the example the image is placed 50 pixels from the bottom and 10 pixels from the right in the browser. But you can place it exactly where you want it. Give it a try. Pretty easy and pretty cool, eh?

Cool, sure. But easy?

You do not learn CSS in 10 minutes. And as mentioned above, this lesson is only meant as a brief introduction. Later you will learn much more in our CSS Tutorial.
For now, concentrate on HTML, and move on to the bottom where you will learn how to get your website out on the Internet so the whole world can see it!


Uploading Pages

Until now, only you have had the satisfaction of viewing your pages. Now it is time for the rest of the world to see your masterpieces.

Is the world ready for that?

The world is ready — you soon will be too. To get your website on the internet, you just need some server space and a free FTP program.

If you have Internet access, you might already have some free server space for your website. Your server space will then probably be called something like http://home.provider.com/~usernumber. But you might need to activate it first. Read more about this in the information from your Internet provider or on their support pages.

Another option is to get some free server space on the Internet. In the same way that you set up an e-mail account (like Gmail), you can register for free server space on the Internet. Several companies offer such a service — including 000webhost.com (click "Order Now" under "Free Hosting"). It only takes a couple of minutes to register.
To have access to the server, you need to know the "Host Name" (for example, ftp.htmlnet.site50.net) and have your username and password ready.

Is that all I need?

To access the server and upload your pages, you also need an FTP program. FTP is short for File Transfer Protocol. A FTP program is used to connect two computers over the Internet so that you can transfer files from your computer to another computer (the server). You might not have such a program yet, but fortunately, this can be downloaded for free.

There are many different FTP programs. One of the better is FileZilla, which is entirely free. So now you can download FileZilla at filezilla.sourceforge.net (pick the Server option).

And how do I upload the pages?

Described below is how you upload your pages to a free account at 000webhost.com with FileZilla. But the procedure is, more or less, the same for all providers and FTP programs.
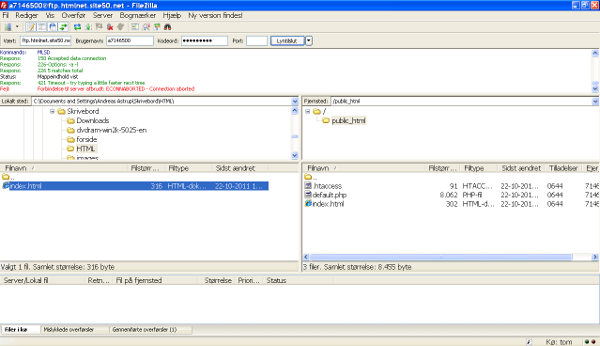
Open the FTP program while connected to the Internet. Insert "Host Name" ("ftp.htmlnet.site50.net" under "Address"), username (under "User") and password (under "Password") and click "Connect". You should now have access to the server. In one side of the program you can see the contents of your computer ("Local Site"), and in the other side, you can see the content of the server ("Remote Site"):

FileZilla

Find your HTML documents and images on your computer (on the "Local site") and transfer them to the server (the "Remote site") by double clicking on them. Now the whole world can see them! (For example, at the address http://htmlnet.site50.net/page1.htm).
Name one of the pages "index.htm" (or "index.html") and it will automatically become the start page. i.e. if you type http://htmlnet.site50.net (without any filename) you will actually open http://htmlnet.site50.net/index.htm.
In the long run, it might be a good idea to purchase your own domain (for example www.your-name.com or www.your-name.net) and avoid the long and complicated addresses you are being assigned by your Internet provider or from providers of free server space. You can find and purchase domains at for example Speednames or NetworkSolutions.

© 2015 Programmer vs Hacker. All rights resevered.