


Layout (CSS)
Wouldn't be great if you could give your pages the layout they deserve?
Sure, but how?
Use Cascading Style Sheets (CSS) to give your website layout, style, and the formats you want. In this lesson you will get a short introduction to CSS. But later you can learn all about CSS from us after the HTML 5 Tutorial Ends. So please consider this lesson only as an appetizer.
CSS is the better half of HTML. And in coding, there is no equality of status: HTML takes care of the rough stuff (the structure), while CSS gives it a nice touch (layout).
As shown in in the Last Lesson, the style attribute can control text colour:
Example 1:
<h2 style="color:green">HTML</h2>
Will look like this in the browser:
HTML
In the example above we use the
style attribute to change the colour. If you wanted to change the colour of every h2 on the page, you'd have to set the style attribute on all of them.It seems like a lot of work?
One of the smart features of CSS is the possibility to manage your layout centrally. Instead of using the
style attribute in each tag, you can tell the browser once how it must layout all the text on the page:
Example 2:
 <html>

   <head>
     <title>My first CSS page</title>
     <style type="text/css">
       h1 {font-size: 30px; font-family: arial;}
       h2 {font-size: 15px; font-family: courier; color:green;}
       p {font-size: 8px; font-family: "times new roman";}
     </style>
   </head>

   <body>
     <h1>My first CSS page</h1>
     <h2>Welcome to my first CSS page</h2>
     <p>Here you can see how CSS works </p>
   </body>

 </html>
- Will look like this in the browser:
My first CSS page
Welcome to my first CSS page
Here you can see how CSS works
In the example above CSS has been inserted in the
In the example all headings on the page will be in Arial in size 30px. All subheads will in Courier size 15 and green. And all text in normal paragraphs will be in Times New Roman size 8 (notice how we set both the font size and font-family with a separating semicolon).<head> section and therefore applies to the entire page. To do this, just use the tag <style type="text/css"> which tells the browser that you are typing CSS.
Another, even better option is to create the CSS in a separate document. With a separate CSS documents you can manage the layout of many pages all at once. This is pretty smart if you want to change the font type or size on a large website with hundreds or thousands of pages. We won't go into that now but you can learn it later in our CSS tutorial.
What else can I do with CSS?
CSS can be used for much more than specifying font types and sizes. For example, you can add columns, colours and backgrounds. Here are some examples for you to experiment with:
 <body style="background-image: url('http://www.html.net/logo.png');">

 <p style="color:green;">Green text</p>

 <h1 style="background-color: blue;">Heading on blue background</h1>
Try inserting the examples in some of your pages - both as shown above and also as CSS inserted in the head section.
Is CSS nothing but colours and font types?
Besides adding layout such as colors, font types etc., CSS are also used to control the page layout and presentation (margins, float, alignment, width, height, etc.). By regulating the different elements with CSS you are able to layout your pages elegantly and precisely.
Example 3:
<p style="padding:25px;border:1px solid red;">I love CSS</p>
Will look like this in the browser:
I love CSS
With the property
float an element can either be floated to the right or to the left. The following example illustrates the principle:
Example 4:
 <img src="bill.jpg" alt="Bill Gates" style="float:left;" >

 <p>Lorem ipsum dolor sit amet, consectetuer adipiscing elit,
 sed diam nonummy nibh euismod tincidunt ut laoreet dolore
 magna aliquam erat volutpat. Ut wisi enim ad minim veniam,
 quis nostrud exerci tation ullamcorper suscipit
 lobortis nisl ut aliquip ex ea commodo consequat...</p>
Will look like this in the browser:

Lorem ipsum dolor sit amet, consectetuer adipiscing elit, sed diam nonummy nibh euismod tincidunt ut laoreet dolore magna aliquam erat volutpat. Ut wisi enim ad minim veniam, quis nostrud exerci tation ullamcorper suscipit lobortis nisl ut aliquip ex ea commodo consequat...
In the example, one element (the image) floats to the left and the other element (the text) fills the hole.
With the property
position, you can place an element exactly where you want it in your page:
Example 5:
<img src="bill.jpg" alt="Bill Gates" style="position:absolute;bottom:50px;right:10px;" >
- Will look like this in the browser:Lorem ipsum dolor sit amet, consectetuer adipiscing elit, sed diam nonummy nibh euismod tincidunt ut laoreet dolore magna aliquam erat volutpat. Ut wisi enim ad minim veniam, quis nostrud exerci tation ullamcorper suscipit lobortis nisl ut aliquip ex ea commodo consequat...
In the example the image is placed 50 pixels from the bottom and 10 pixels from the right in the browser. But you can place it exactly where you want it. Give it a try. Pretty easy and pretty cool, eh?
Cool, sure. But easy?
You do not learn CSS in 10 minutes. And as mentioned above, this lesson is only meant as a brief introduction. Later you will learn much more in our CSS Tutorial.
For now, concentrate on HTML, and move on to the bottom where you will learn how to get your website out on the Internet so the whole world can see it!
Uploading Pages
Until now, only you have had the satisfaction of viewing your pages. Now it is time for the rest of the world to see your masterpieces.
Is the world ready for that?
The world is ready — you soon will be too. To get your website on the internet, you just need some server space and a free FTP program.
If you have Internet access, you might already have some free server space for your website. Your server space will then probably be called something like http://home.provider.com/~usernumber. But you might need to activate it first. Read more about this in the information from your Internet provider or on their support pages.
Another option is to get some free server space on the Internet. In the same way that you set up an e-mail account (like Gmail), you can register for free server space on the Internet. Several companies offer such a service — including 000webhost.com (click "Order Now" under "Free Hosting"). It only takes a couple of minutes to register.
To have access to the server, you need to know the "Host Name" (for example, ftp.htmlnet.site50.net) and have your username and password ready.
Is that all I need?
To access the server and upload your pages, you also need an FTP program. FTP is short for File Transfer Protocol. A FTP program is used to connect two computers over the Internet so that you can transfer files from your computer to another computer (the server). You might not have such a program yet, but fortunately, this can be downloaded for free.
There are many different FTP programs. One of the better is FileZilla, which is entirely free. So now you can download FileZilla at filezilla.sourceforge.net (pick the Server option).
And how do I upload the pages?
Described below is how you upload your pages to a free account at 000webhost.com with FileZilla. But the procedure is, more or less, the same for all providers and FTP programs.
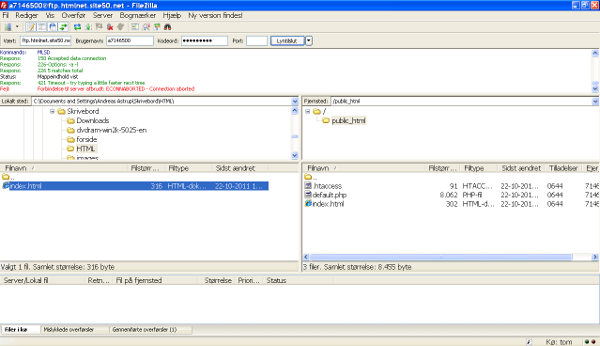
Open the FTP program while connected to the Internet. Insert "Host Name" ("ftp.htmlnet.site50.net" under "Address"), username (under "User") and password (under "Password") and click "Connect". You should now have access to the server. In one side of the program you can see the contents of your computer ("Local Site"), and in the other side, you can see the content of the server ("Remote Site"):
Find your HTML documents and images on your computer (on the "Local site") and transfer them to the server (the "Remote site") by double clicking on them. Now the whole world can see them! (For example, at the address http://htmlnet.site50.net/page1.htm).
Name one of the pages "index.htm" (or "index.html") and it will automatically become the start page. i.e. if you type http://htmlnet.site50.net (without any filename) you will actually open http://htmlnet.site50.net/index.htm.
In the long run, it might be a good idea to purchase your own domain (for example www.your-name.com or www.your-name.net) and avoid the long and complicated addresses you are being assigned by your Internet provider or from providers of free server space. You can find and purchase domains at for example Speednames or NetworkSolutions.
 About
About Tags
Tags Popular


0 comments:
Post a Comment
We’re eager to see your comment. However, Please Keep in mind that comments are moderated manually by our human reviewers according to our comment policy, and all the links are nofollow. Using Keywords in the name field area is forbidden. Let’s enjoy a personal and evocative conversation.