Creating Special Effects
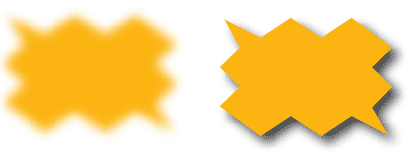
Using filters and live effects we can creates lots of special effects instantly. You can smooth out sharp corners, create warp text, add drop shadows and make textures with the live effects. There are many filters in Illustrator and you can have lots of creativity in experimenting all the filters.
Live Effects or Filters
To create special effects, we can use either use Live Effects of Filters. Most of the time I will be using live effects as I can continue making changes using the Appearance Palette. The choice is up to you.
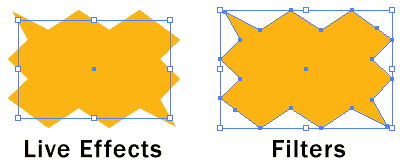
Live Effects: When you apply live effects to objects you can still continue to modify the effects and objects. You will need to expand the object break it into paths again.
Filters: When you apply filters, you can’t make changes to the effect anymore. It is already expanded.

Raster Effects
There are some effects that uses raster effects instead of vector. This includes all of the effects in the bottom section of the Effect menu, and the Drop Shadow, Inner Glow, Outer Glow. When you apply raster effects, it uses the resolution in your raster settings which you can set it under Effect>Document Raster Effects Settings. Raster Effects are not considered as vector as it contains high resolution bitmap.

Common Uses of Effects
Round Corners (Effect>Stylize>Round Corners)
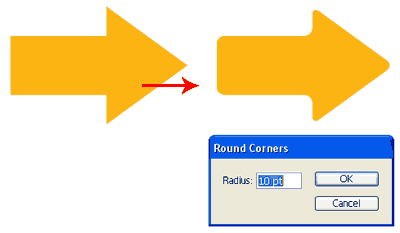
Round Corners is very useful in making smooth corners from sharp angles. You can set the Radius to adjust the amount of smoothness you need for the corners. It can add style to your icons and making your illustrations appear more natural.

Warp Options
This is one of my favourite filter. It can make you text stand out from the crowd by distorting it using arc, fisheye and wave effects. It can also bend bend boring lines to curves. Something to spend time experimenting with.

Distort & Transform (Effect>Distort & Transform>Roughen)
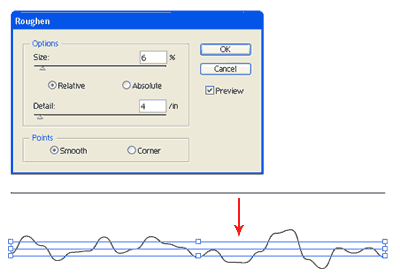
Roughen, Zig Zag and Twist are some handy tools under Distort to quickly make wave or roughening the edges. You can make make paper tears, waves and terrains with it. Below is an example how I can make a mountain skyline just by roughening a line.

Editing or Deleting Live Effects
After you have applied Live Effects, you can edit it with your Appearance Palette. Below shows the arrow with Round Corners effect. You can edit it by double clicking on the effect or delete it by clicking on the dustbin icon..

Conclusion
There are many more things you can do with live effects, so spend some time an experiment with it. Remember to go Object>Expand Appearance if you need to expand the shapes.
Applying 3D Extrude & Bevel
With 3D Live Effects you can add dimension to your 2D drawings easily. Though the features are limited, you can still control the appearance of 3D objects with lighting, shading, rotation, and more. You can also easily map artwork onto the 3d surfaces. Let’s see how each 3D effects works…
3D Extrude & Bevel
3D Extrude adds depth to an object to make it 3D. Select your object and go Effect>3D>Extrude & Bevel. The options window pops up. Change the Extrude Depth to determine the amount of depth. The Bevel sets the type of edges for the 3D object. Click and drag the cube to define how the star rotate in 3d space. You can also change the surface shading to define the texture.

3D Revolve
3D Revolve effect adds depth to an object by revolving an axis. In the illustration below, I have drawn half of the bottle. The 3D Revolve will make it revolve from the leftmost axis at 360degrees to form a 3D bottle. To revolve an object go to Effect>3D>Revolve.

Mapping Artwork
You can easily map graphic on to a 3D object. First you need to add your graphic to the Symbols Palette. Next, got to 3D Revolve Options and click Map Art and pick the surface to map to. For my bottle, I realized the surface of the bottle is on Surface 3 of 4. I can tell this by the red wireframe on the bottle in the artboard. I then select the graphic to map for Symbols and resize my graphic.


3D Rotate
3D Rotate lets you quickly rotate a 2D graphic in 3d space. It can be found under Effect>3D>Rotate.

Edit 3D Appearance
Anytime you want to make changes to a 3D object, you can go to the Appearance Palette and double click on 3D Extrude & Bevel to make your new changes.

Expanding 3D Appearance
To fill the surface with gradients and other effects, you will need to expand the appearance of the 3D object. Once expanded, you cannot make any more changes to the 3D effect anymore. However, you can add gradients and strokes effects to each surfaces. To expand the 3D appearance go to Object>Expand Appearance. After that you can use Direct Selection Tool to select the surfaces you want to apply gradient.


 About
About Tags
Tags Popular


0 comments:
Post a Comment
We’re eager to see your comment. However, Please Keep in mind that comments are moderated manually by our human reviewers according to our comment policy, and all the links are nofollow. Using Keywords in the name field area is forbidden. Let’s enjoy a personal and evocative conversation.