


Attributes
You can add attributes to a number of elements.
What is an attribute?
As you probably remember, elements give structure to a HTML document and tells the browser how you want your website to be presented (for example,
<br> tells the browser to insert a line break). In some elements, you can add more information. This additional information is called an attribute.
Attributes are always written within a start tag and are followed by an equal sign and the attribute details written between quotes.
Example 1:
<h2 title="Hypertext Language Markup">HTML</h2>
Would look like this in a browser:
HTML
The
title attribute is used to type a short description of the content that displays when you hover over it. If you — without clicking — place the cursor over the word HTML, you will see the text "Hypertext Language Markup" appear.
Try it yourself ! Add a title attribute inside any open tag. In the quotations marks, add the text you want to see when the mouse hovers over the title text.
What is the catch?
There are many different attributes. A more fun one is
style. With the style attribute you can add layout to your website. For instance a background colour:
 <html>

   <head>
   </head>

   <body style="background-color:#ff0000;">
   </body>

 </html>
The example will show a completely red page in the browser - go ahead and see for yourself. We will explain in greater detail how the colour system works in a few moments.
Note that some tags and attributes use US spelling i.e. color instead of colour. It is important that you are careful to use the same spelling as we use in the examples in this tutorial - otherwise, browsers will not be able to understand your codes. Also, don't forget to always close the inverted commas (quotation marks) after an attribute.
How did the page become red?
In the above example, we asked for the background colour with the code "#ff0000". This is the colour code for red using so called hexadecimal numbers (HEX). Each colour has its own hexadecimal number. Here are some examples:
White: #ffffff
Black: #000000 (zeros)
Red: #ff0000
Blue: #0000ff
Green: #00ff00
Yellow: #ffff00
Black: #000000 (zeros)
Red: #ff0000
Blue: #0000ff
Green: #00ff00
Yellow: #ffff00
A hexadecimal colour code consists of the pound sign and six digits or letters. There are more than 1000 hex codes and it is not easy to figure out which hex code is tied to a specific colour. You can also use the English name for the most common colours (white, black, red, blue, green and yellow).
Example 3:
<body style="background-color: red;">
Enough about colours. Let's get back to the attributes.
Which elements can have attributes?
Some attributes apply to all elements (called global attributes) and some only apply to certain elements.
You will often use attributes in tags such as the
<body> tag while you will rarely use attributes in, for example, a <br> tag since a line break normally is a line break without any parameters to adjust.
Just as there are many different elements, so there are many different attributes. Some attributes are tailor made for one particular element while others can be used for all elements. And vice versa: some elements can only contain one kind of attribute while others can contain many.
It may sound a bit confusing but once you get acquainted with the different attributes it is actually very logical and you will soon see how easy they are to use and how many possibilities they introduce.
This tutorial will introduce you to the most important attributes.
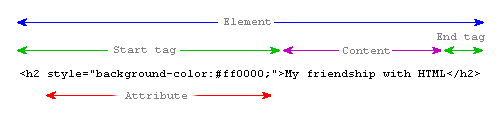
Exactly what parts does an element consist of?
Generally an element consists of a start tag with or without one or more attributes, some content and an end tag. It's as simple as that. See the illustration below.
Links
What do I need to make a link?
To make links, you use what you always use when coding HTML: an element. A simple element with one attribute and you will be able to link to anything and everything. Here is an example of what a link to " Programmervshacker.co.vu " could look like:
Example 1:
<a href="http://www.programmervshacker.co.vu/">link to PvsH</a>
Would look like this in the browser:
The element
<a> stands for "anchor". And the attribute href is short for "hypertext reference", which specifies where the link leads to — typically an address on the internet or a file name.
In the above example the attribute href has the value "http://www.programmervshacker.co.vu", which is the full address of Programmer vs Hacker and is called a URL (Uniform Resource Locator). Note that "http://" must always be included in URLs. The sentence "link to PvsH" is the text that is shown in the browser as the link. Remember to close the element with an
</a>.What about links between my own pages?
If you want to make a link between pages on the same website, you do not need to spell out the entire address (URL) for the document. For example, if you have made two pages (let us call them page1.htm and page2.htm) and saved them in the same folder you can make a link from one page to the other by only typing the name of the file in the link. Under such circumstances a link from page1.htm to page2.htm could look like this:
Example 2:
<a href="page2.htm">Click here to go to page 2</a>
If page 2 were placed in a subfolder (named "subfolder"), the link could look like this:
Example 3:
<a href="subfolder/page2.htm">Click here to go to page 2</a>
The other way around, a link from page 2 (in the subfolder) to page 1 would look like this:
Example 4:
<a href="../page1.htm">A link to page 1</a>
"../" points to the folder one level up from position of the file from which the link is made. Following the same system, you can also point two (or more) folders up by writing "../../".
Did you understand the system? Alternatively, you can always type the complete address for the file (URL).
What about links within a page?
You can also create internal links within a page. For example a table of contents at the top with links to each chapter below. All you need to use is a very useful attribute called
id (identification) and the pound symbol "#".
Use the
id attribute to mark the element to which you want to link. For example:
<h1 id="heading1">heading 1</h1>
You can now create a link to that element by using "#" in the link attribute. The "#" must be followed by the
id of the tag you want to link to. For example:
<a href="#heading1">Link to heading 1</a>
Can I link to anything else?
You can also make a link to an e-mail address. It is done in almost the same way as when you link to a document:
Example 6:
<a href="mailto:programmervshacker@gmail.com">Send an e-mail to Programmer vs Hacker</a>
will look like this in the browser: (click on the Text)
The only difference between a link to an e-mail and a link to a file is that instead of typing the address of a document, you type
mailto: followed by an e-mail address. When the link is clicked, the default e-mail program opens with a new blank message addressed to the specified e-mail address. Please note that this function will only work if there is an e-mail program installed on your computer. Give it a try! About
About Tags
Tags Popular


0 comments:
Post a Comment
We’re eager to see your comment. However, Please Keep in mind that comments are moderated manually by our human reviewers according to our comment policy, and all the links are nofollow. Using Keywords in the name field area is forbidden. Let’s enjoy a personal and evocative conversation.