Photorealism with Gradient Mesh
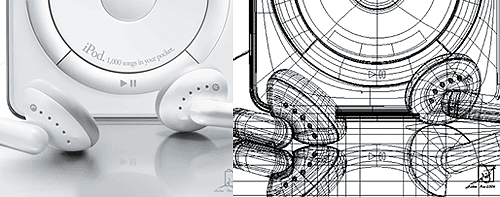
Gradient Mesh allows you to create shapes with gradients. And many artist has been able to create photo realistic drawings of people, products and vehicles just by using Gradient Mesh. Here is an example of photorealistic artwork by Halim Ghobane. If you don’t believe your eyes, the gradient mesh line will show the answer.

Creating a Gradient Mesh Object
Here is a quick overview of a gradient mesh object. You can apply colors to Mesh Points and edit them using Direction Selection Tool to control the shapes of the mesh object. The Mesh Line shows the contours of the object.

Creating a Gradient Mesh Object
Method 1: Using Gradient Mesh Tool
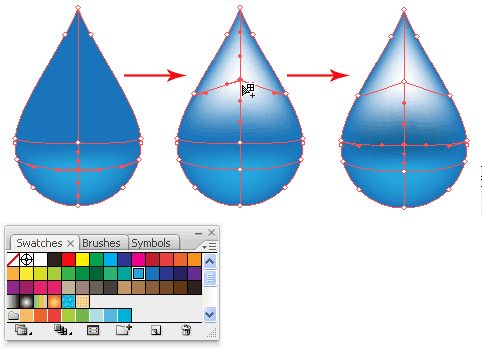
To turn an object into a gradient mesh, select the Gradient Mesh Tool and click once on the shape to create a mesh point. Click above the Mesh Line to crate another point.

Select the first mesh point and select a lighter blue for the base of the water droplet. Next add a third point on top and set it to white. Finally, select the middle point and give it a dark blue.

Select all the 3 mesh points with the Direction Selection Tool and drag it down to mimic the contours of a water droplet. And realistic water droplet is done!

Method 2: Using Gradient Mesh Tool
To create a grid of gradient mesh object quickly, you can use the function Object>Create Gradient Mesh. Enter the number of rows or columns you want to create. You can also create a highlight in the middle by setting Appearance to Center.

Conclusion
Gradient mesh can be hard to grasp for beginners as the mesh line starts to mess out when you have a irregular shaped object.
Using the Symbol Tools
Symbols help you to create repeated design elements easily. First, you will need to create a symbol which acts like a master copy. New instances you created are linked with the master copy. Once you update the master copy, the instances will automatically update the graphic but retain all the transformations made to the symbols.

Creating a New Symbol
Once you have created your graphic, select and drag it to to Symbols Palette (Window>Symbols). Click OK to confirm.

Symbol Sprayer Tools
Next select, the Symbol Sprayer Tool. You can double click on the Symbol Spray Tool to open up the Symbolism Tools Options. In the options you can change the diameter or intensity of sprayer.


With the Symbol Sprayer Tool, click and drag to create new instances of your symbol.

There are a couple of other things you can do with Symbol Spray Tool. Switch to Symbol Spinner and click and drag to change the direction of the instances. The arrows will point the direct to rotate to.

To create random sizes, select the Symbol Sizer and click to enlarge the symbols. You can hold Alt/Option to reduce the size too.

Finally, we will stain it with a yellow color. Select the Symbol Stainer and select yellow for the foreground color. Click on areas you want to stain it with. Go over the areas again if you want to have a stronger stain.

Expanding Symbol Objects
If you need to expand the symbols objects to paths, you can go the Symbols Palette and choose Break Link to Symbol.

Editing your symbol
To make changes to you symbols, drag a copy of your symbol to the artboard, double click on it and it will warn you that the changes will be applied to all its instances. Make your changes and you will see that it automatically updates itself.
For Illustrator CS2 or below: Drag a copy of your symbol to the artboard. Go Object>Expand to expand your symbol. Make the changes you want. Hold Alt/Option and drag it over the old symbol in the Symbols Palette to replace it.


 About
About Tags
Tags Popular


0 comments:
Post a Comment
We’re eager to see your comment. However, Please Keep in mind that comments are moderated manually by our human reviewers according to our comment policy, and all the links are nofollow. Using Keywords in the name field area is forbidden. Let’s enjoy a personal and evocative conversation.