Compiling the C with Visual Studio 2013 on Windows
- First get the Visual studio from here (Official Link) (We recommend you to download the ISO copy).
- After Downloading the Visual Studio from Microsoft, Run the installation and wait for some time to complete installation (it takes some time to install).
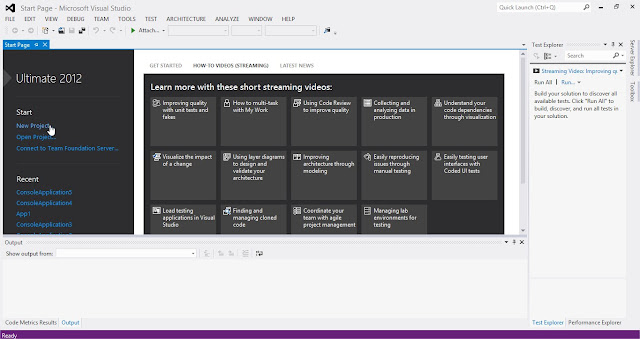
- After completing the Installation On your computer “Run Visual Studio 2013″ As soon as You start visual Studio, You will be presented with Visual Studio Start Screen.

- Click on New Project.
- And now click on Visual C++ and Select “Win32 Console Application“, and Hit on OK.
- In next Window click on “Finish” button.
- Now You will be presented with your workplace where you can starting writing your code.
- By default Visual Studio adds the stdafx.h library and some default code. You can overwrite it and write your own code.And there is no need to add the conio.h header file to your code.
- After completion of writing your code don’t forget to add the system(“pasue”); before return statement on your code.
- By default your visual studio complies your code with C++ compiler which will give you so many errors on your C code, So in-order to compile your code with C compiler Hit on “Project Menu” (Alt+P) and Select the “Console Application Properties” (Alt+F7).
- Now Hit on C/C++ and select “Advanced”
- Now In the Right side menu select “Compile As” and choose “Compile As C code” and click on Ok to save the settings,
- Now Hit on “Local Windows Debugger” to run your code!.
Compiling C++ with Visual Studio 2013:
- Compiling C++ on visual studio 2013 is much easier than compiling C code.
- Click on New Project.
- And now click on Visual C++ and Select “Win32 Console Application“, and Hit on OK.
- In next Window click on “Finish” button.
Now You will be presented with your workplace where you can starting writing your code. Before writing the code Don’t forget to add this code After link-section. using namespace std; and add this code with after completion of writing your code system(“pause”); and hit on Local Windows Debugger to compile your code! 
2- Compiling C and C++ on Code::Blocks
Code Blocks is one of the Best free and open source, cross-platform IDE which supports multiple compilers including GCC and Visual C++. It is developed in C++ using wxWidgets as the GUI Toolkits.
Compiling C and C++ on Code::Blocks is made so simple with Code Blocks.
Note: Before Downloading the Binaries from Code::Blocks You need to know the slight difference in the packages available on Code::Blocks for Download
You need to download the 3rd one if you have Admin rights on your computer and 4th one if you don’t have admin rights to install on your Windows Computer.
- After Downloading the right package for your run the installation And Launch Code::Blocks
- Hit on File (Alt+F) and select New–>>File
- Now here you will be able to select the type of source files.
- Select C/C++ source file
- and continue to your work place after saving the file and start coding!
- To compile click on Run Button
Conclusion
So, now you can easily compile C and C++ Programs on Windows with Visual Studio. If you have any kind of queries or questions left then do let us know. We shall clear your concerns as soon as possible. Furthermore, don’t forget to share this guide with your other friends and circle too.


 About
About Tags
Tags Popular


0 comments:
Post a Comment
We’re eager to see your comment. However, Please Keep in mind that comments are moderated manually by our human reviewers according to our comment policy, and all the links are nofollow. Using Keywords in the name field area is forbidden. Let’s enjoy a personal and evocative conversation.