

Creating and customizing blogs has never been easier, even for every day people. If anyone wants to learn more about how this can work, they should plan to use a functional web builder to manage this process.

Though blogs may still seem high tech to many people, there are actually a few simple tools people do have at their disposal. Web builders have helped people customize the approach that they can take during the course of these projects. These web builders have built up a reputation among many people for offering the best experience that they can find. Even if people don’t understand how they can code, these web builders can make it fairly simple for people to create their own blogs. This will help them learn more about the projects available to them as well.
Adding a Template to your Blog
- First of all Download any Template of your Choice. You can Download a High Quality Professional Blogger Templates from this site Templateable
Select any Template (Open it) It will contain a Download Button just Download and Unzip it
- After Downloading, go to Blogger.com and sign in with your Google Account.
- From the Navigation Menu, Go to Template.

- Then Click on Backup/Restore from Top Right.

- You will see a Pop-up like below. Just click on Choose File.
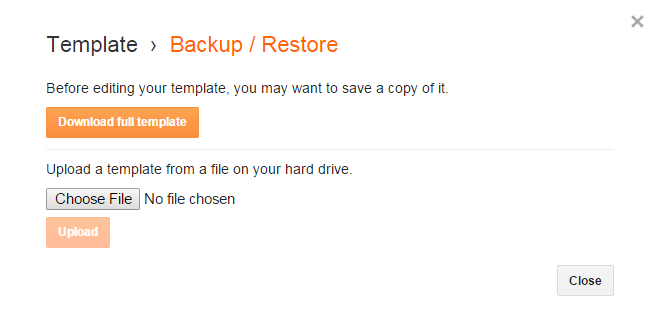
- Then you have to locate the template file which you downloaded from the first step.
- After Choosing the File, Click on upload and wait for some time for the template to be uploaded.
- After uploading, Just click on View Blog on the top and you will see your blog's theme being updated.
Customizing the Template and Layout
- To set up Everything and Make your Blog look cool. Go to Layout.

- Then Click on the Edit of any widget and then Click on Remove to delete it. (You have to do this step to these widgets in the Layout : About Me and Blog Archive)

- You will see that the Navbar and the Attribution Cann't be removed, So we have to remove it by using the HTML Editor. Just go to Template and Click on Edit HTML

- You will see an editor. Just click on Jump to Widget and Select "Navbar"
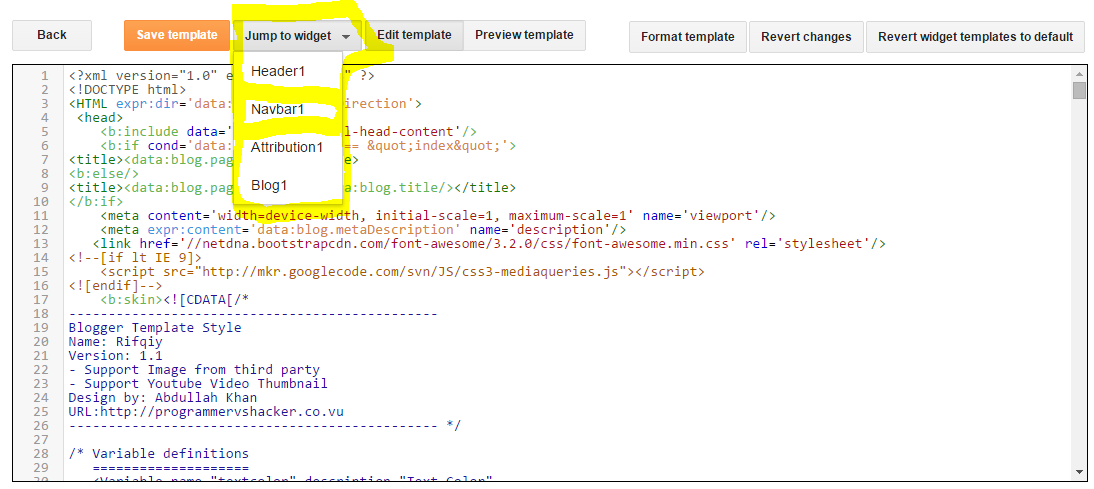
- You will be taken to the Navbar Widget. See the first line after jumping to the Navbar Widget.

- Delete the Code Starting From <b:widget id='Navbar1 to </b:widget>
- Now again Click on Jump to Widget and Select Attribution1 and delete the following code.
<b:widget id='Attribution1' locked='true' title='' type='Attribution'></b:widget>
- After Deleting the above Code, Click on Save Template.
- After Saving, Click on View Blog and you will see your Blog without any Navbar and Attribution.
Conclusion
This Post will tell you exactly how to Add and Customize your template and also how to remove the Navbar and Attribution from your blog. If you like this Post, then please do share because, Sharing is Caring.
 About
About Tags
Tags Popular


Damn good!
ReplyDelete